# WELCOME
Welcome to the apinity end-user documentation
## Introduction
**apinity** enables and simplifies the exchange of digital services for the insurance industry.
Digital services developed and maintained by independent third-party service providers are onboarded and offered on display on [**apinity Xplore**](https://marketplace.apinity.io). These services can be purchased and consumed by Service Consumers. The web interface offers providers and consumers with all the needed functionalities to support the service provision and consumption experience. On the backend, our marketplace engine is automatically configured to route all the traffic between consumers and service providers using API Gateway technologies.
{% hint style="info" %}
**apinity Xplore** is one specific instance of the **apinity SaaS** whitelabel solution.
Customers can acquire an apinity portal as a fully managed SaaS solution to be their own customized hub for internal and public API services.
For more information about features and pricing, check [**https://apinity.io/**](https://apinity.io/).
Most of this documentation refers to navigation and actions on apinity Xplore. The user experience in a customized apinity SaaS tenant may differ at certain points, though it should be mostly similar.
{% endhint %}
## Jump right in
| [](https://docs.apinity.io/quick-start/publish-your-first-service-quick) | [](https://docs.apinity.io/quick-start/consume-a-service-quick) |
| :------------------------------------------------------------------------------------------------------------------------------------------------------------------------------------------------------------------------------------------------------------------------------------------------------------------------------: | :---------------------------------------------------------------------------------------------------------------------------------------------------------------------------------------------------------------------------------------------------------------------------------------------------------------------: |
| If you want to **publish a service** on the portal, use this quick start guide to create a service and a demo plan. | If you want to **subscribe to an existing service** on the portal, use this quick start guide on subscribing to a service. |
# Publish a service
Quick overview
**Steps to publish a service:**
***
### 1. Sign up
**Sign Up** on [apinity Xplore](https://marketplace.apinity.io) with your e-mail address and log in.
### 2. Create a Workspace
{% hint style="info" %}
A *workspace* represents your company, organization or team in the marketplace.
You will manage your services and subscriptions from the workspace.
{% endhint %}
In the top-right corner, create a Workspace by clicking on **Create Workspace** and filling out the form.
You now have full access to the apinity marketplace.
### 3a. Define APIs
{% hint style="info" %}
An *API* is the technical representation of a product.
APIs can belong to one or more Services.
{% endhint %}
* Go to **My Hub** > **APIs**.
* Click **Upload APIs** to upload an OAS/swagger definition file in JSON format.
* Click **Assign Access Control** to define authentication method(s) for your API(s).
### 3b. Create a Service
{% hint style="info" %}
A *service* is the marketing representation of a product and its features.
It can be created parallelly to defining the APIs.
{% endhint %}
* Go to **My Hub**.
* Start service creation by clicking on **Add Service**.
* Specify a Service Name and click **Add Service**.
* On the next page, fill out the *Overview* and the *Product Description*. Mandatory fields are indicated with \*.
### 4. Create a Plan
{% hint style="info" %}
A *plan* is the commercial representation of a service. In a plan, you associate APIs to the service, and define the pricing and limits of consumption.
{% endhint %}
* In the top-right corner, click on **Continue to Step 2: Plans**. On the next page, click on **Add a Plan**.
* Define the plan's Name and **Service Type**.
* Using the available tabs, proceed to:
* Define the plan's **Permissions**.
* **Assign APIs** to the plan.
* Define **Limits and Pricing**.
* Upload a legal **Contract** for your provided service.
### 5. Publish
* When you have filled in all the required information, click **Proceed to Publishing** in the top-right corner.
* Click on Submit plans in the left menu. In the Publish Service dialog, select the items you are ready to submit. By clicking **Submit**, you agree to the [Terms of Service](https://marketplace.apinity.io/terms-and-conditions).
Your service has now been submitted for review. This review can take a few business days. You will receive an email once the review is finished and your service is available.
# Consume a service
Quick overview
**Steps to Consume a Service:**
* **Sign Up** on [apinity Xplore](https://marketplace.apinity.io/) with your e-mail address and log in.
* In the top-right corner, create a Workspace for your company by clicking on **Create Workspace** and filling out the form.
{% hint style="info" %} A *workspace* represents your company, organizatior or team in the marketplace.
You will manage your services and subscriptions from the workspace.
{% endhint %}
* Go to the [**Catalog**](https://marketplace.apinity.io/catalog).
* Browse to the service you are looking for and click it to open.
* In the service description click on the tab **Available Plans** to see the different pricing options. By clicking on the plan cards you can see all pricing details, limits and technical documentation.
If the service offers a Demo Plan (indicated with a badge), you can use the demo plan for testing the API and integration for free.
* On the preferred Plan, click on **Subscribe.** A “Review order” page will show you all details of the subscription as well as the legal documents. In order to continue, click on **Complete Order**.
* The technical setup of the subscription will happen in the background and after a few seconds you will be brought to the [**Subscriptions**](https://marketplace.apinity.io/my-hub/subscriptions) page where the new subscription will be visible.
* In the next step, you need to set up your API credentials. Click on the subscription and scroll down to the *Create or Assign Consumer Clients* section. Click **Create New & Assign**.
* Define a name for this Consumer client and copy the automatically generated API-Key. **Save the API Key in a secure place.**
Your subscription is now set up and can be consumed via any application, command line tool or Postman.
In order to see details on the technical consumption of an API, please refer to [**Consuming an API**](/step-by-step/subscribe-and-consume-a-service/consume-an-api-technical-implementation).
# Manage your User Account
{% hint style="info" %}
The articles under this section describe the default user management on **apinity Xplore**.
User account managament in customized **apinity** SaaS tenants may differ.
* Sign Up may be disabled
* Single Sign-On (SSO) may be implemented with various identity providers
{% endhint %}
# Signup / Login
{% hint style="info" %}
This experience may differ in customized **apinity exchange** tenants.
* The Catalog may be hidden
* Sign Up may be disabled
* Single Sign-On (SSO) may be implemented with various identity providers
{% endhint %}
### Browsing the marketplace
Go to [https://marketplace.apinity.io/](https://marketplace.apinity.io) to open the marketplace webpage. You can browse the catalog of available services without an account. Should you want to consume or provide a service, you can proceed to sign up.
### Sign up as User
In the top-right corner, click the **Sign Up** button.
Fill in the form and define a password.\
Please consider the indicated password complexity requirements.

\
You can access and read our marketplace[ terms of service](https://marketplace.apinity.io/terms-and-conditions) &[ data policy](https://marketplace.apinity.io/data-policy) by clicking on the respective links above the Sign Up button.
{% hint style="success" %}
By signing up, you accept the terms of service of apinity marketplace and confirm that you have read our data policy.
{% endhint %}
\
After clicking on the **Sign Up** button, you will receive a welcome e-mail with a link to confirm your e-mail address. This link expires within 12 hours. Once you have confirmed your e-mail address, you will be forwarded back to the marketplace webpage and asked to log in with your new username and password.

# Edit your Profile
After you have logged into your confirmed account, you may choose to edit your name and upload a picture. To do so, please click on your profile picture icon in the top-right corner and select **Edit Profile**.
Please be sure to click **Save Changes** when you are finished with your changes.

# Change your Password
If at any point, you would like to change your password, please click on your profile picture icon in the top-right corner and select **Change Password**.

In the popup window, click **Continue** to receive an email with a link to trigger the password update.
In the email, click on the **Set new Password** option.
You will be redirected to the apinity marketplace with a dialogue to update the password:

{% hint style="info" %}
Use 8+ characters including both upper and lowercase, at least 1 number, and 1 special character in your password.
Your new password must not be the same as any used password.
{% endhint %}
# Reset your Password
If you happen to forget you password, it’s possible to reset it.
On the marketplace main page, click **Log in** in the upper right-hand corner, then click on the **Reset Password** link.
Enter you email address and click **Submit**.
You will receive an email to reset your password.
# Manage your Workspace
### Overview
**Definition:** A Workspace is a public profile which is used to provide or consume any services. In many cases, this is a company profile.
As Workspaces are the main actors on the marketplace, the Workspace name should be chosen intuitively so that other people on the marketplace understand who you are at first glance.
Every Workspace on the marketplace can provide and consume unlimited services. Multiple products can be offered on one Workspace.
Multiple users can belong to one Workspace, and one user can belong to up to 10 Workspaces.
# Create a Workspace
A Workspace is a business profile managed by one or more users. The workspace is used to publish services or to subscribe to them.
You can create your first workspace by clicking on **Create Workspace** in the top-right corner after having created a user account. If you are already member in a workspace, you can drop down the Workspace selector and choose *Create Workspace* there.
In the popup window, enter the workspace details:
* Define a name & upload your logo.
* Enter your company details e.g. company name, VAT-ID, address. This will be used as the billing address.
* Add a contact person (This should be a person who is in charge of billing and can be contacted for administrative questions).
{% hint style="info" %}
The **contact person** details will be **visible to your subscribers** as well.
The company details are only visible to apinity.
{% endhint %}
Finally, press **Create Workspace** below to submit the form.
You are now the owner of a Workspace. You can consume services on our marketplace as well as provide services via your workspace.
You can invite other Users to be a part of your Workspace. Different Users within a Workspace can be given different access rights. Please refer to [Manage Users](/step-by-step/manage-your-workspace-overview/manage-users) .
### Start working with your Workspace profile
Once you’ve create your workspace you can either [publish your service](/quick-start/publish-your-first-service-quick) or [subscribe](/quick-start/consume-a-service-quick) to any service on the marketplace.
# Edit Workspace Details
You can edit or provide more information about the workspace under **Workspace Details** in the left side menu of [**My Hub**](https://marketplace.apinity.io/my-hub).
**Contact Person:** Please make sure to always keep valid contact details of a person who we can contact for administrative questions regarding the relationship between this workspace and apinity. The contact person name and e-mail will also be visible to your subscribers.
**IBAN**: Only required if you are providing services.
{% hint style="warning" %}
IBAN is mandatory if you are entitled to revenue from apinity generated by your provided services.
{% endhint %}
# Manage Users
The **Users** section in the left hand menu under [**My Hub**](https://marketplace.apinity.io/my-hub) enables you to invite new users to your Workspace, as well as manage existing users if you are a Workspace owner.
As an Owner, you have the option to set other Users as *Owner* or *Member*. You also have the option to *Remove User* from the Workspace.
Members and Owners will also see an option on their user card to *Leave Workspace*, as long as there remains at least one Owner on the workspace.
{% hint style="info" %}
**Members** in a marketplace workspace have a limited scope - they can view details of existing subscriptions, but cannot edit any detail, and cannot subscribe to new services.
{% endhint %}
{% hint style="info" %}
**apinity exchange** tenants may have different user roles and scopes, defined by the tenant administrator.
{% endhint %}
# Provide a Service
## Quick Start
For a brief overview check out [Publish your first Service - quick overview](/quick-start/publish-your-first-service-quick)
## Overview
**Definition:** A *Service* is a product or service you offer via the marketplace.
The service description introduces the product in general, and the associated *Plans* define the commercial details.
Technical details are captured in the *APIs* section. A plan can have one or more APIs associated with it, and different plans can define different pricing for the same APIs.
Every Workspace on the marketplace can provide and consume unlimited Services.
Illustration of the relationships between Users, Workspaces, Services, Plans and Subscriptions (click to enlarge)
# APIs
An API is the technical representation of a product. APIs can belong to one or more Services.
The **APIs** section of My Hub will contain the technical specifications and access controls for your APIs.
### Uploading APIs
Use the **Upload APIs** button to upload API definition (OAS) files. Open API 2.0, 3.0 and 3.1 standards are supported. The API calls contained in your OAS file will be automatically parsed and displayed to consumers.
{% hint style="info" %}
YAML files are currently not supported, only JSON.
{% endhint %}
Expanding an API entry with the drop-down arrow will show you the Base URL, endpoints, and further details rendered from the OAS file.
{% hint style="info" %}
Please note that only one Base URL will be used from the definition. Multiple servers in one API will not be handled by the gateway. If you have multiple servers in your OAS definition, the first one will be used.
{% endhint %}
You can now continue to **Assign Access Control**. This will bring you to the Access Controls tab where you specify authorization details used by your API.
###
### Access Control
{% hint style="info" %}
**Access Control** provides the authentication between the apinity marketplace and your API endpoint. It is **not shared with the consumers**. They will use their own [Consumer Clients](/step-by-step/subscribe-and-consume-a-service/consumer-clients) to authenticate to your service after they subscribed, and apinity will use your Access Control to forward their request to you.
{% endhint %}
* Access Control is optional. It allows for hands-off onboarding of consumers, leaving the authorization flow entirely to be handled by the marketplace.
* If you skip Access Control, it is assumed that your API endpoint does not require authentication (e.g. a test or demo API), or that you provide the consumers with individual authorization tokens.
* Access Controls can be freely assigned and unassigned to the uploaded APIs.
* One access control can be assigned to one or multiple APIs.
You can choose from the following authentication types and methods:
| Static credentials | Token endpoint |
| --------------------------------- | ----------------------------------------- |
| Basic Auth | OAuth2 with grant type password |
| Header with API Key | OAuth2 with grant type client credentials |
| Header with Username and Password | HMAC |
| | Header with authentication key |
| | JSON payload |
All your access controls will be listed in a table, and you can use the popup menu to **Edit** and **Assign them to an API**.
The assigning dialogue will highlight APIs that *already have access controls*. If you assign a new access control to these, it will replace their existing one.
You may also see APIs flagged as *invalid*. These have incorrect or incomplete technical specification, and cannot have access control assigned at this point.
Once you successfully **uploaded an API** and decided your access control, you can use the API in a [Plan](/step-by-step/provide-a-service-on-the-marketplace/add-a-plan).
# Add a Service
A service is the marketing representation of a product and its features.
In My Hub, click **Add Service** in the top-right corner.
In the popup, enter a Service Name and click **Add Service**.
{% hint style="info" %}
You can create *Service Descriptions* independently of the technical setup under API Collections. You will assign APIs to the service in the next step, under Plans.
{% endhint %}
### Service Description
In **Step1: Service Description**, you have the opportunity to refine your Service Name. The Service Name will be shown in the catalog together with your Workspace name and therefore should be unique and describe your service clearly.
The **Short Description** is a short plain text that will be displayed on the catalog card of the service.
The full **Product Description** is a richt text where you can embed pictures, and use paragraphs and font formatting. This allows you to create eye-catching info material about your service.
{% hint style="warning" %}
Once the service is published, the **name cannot be changed**.\
Please keep this in mind before submitting your service for publication.
{% endhint %}
Besides that, please fill out as many fields as possible to present your services in the best light and create a worthwhile customer experience for your potential customers.
You can use the **Service Visibility** toggle to decide if you want to hide your service from the marketplace catalog while still maintaining a deep link / direct URL to your published service. This deep link can be saved and shared at your discretion. The Visible toggle can be turned on or off at any time.
Once all the necessary information has been filled out in Step1, in the top-right corner, click on **Continue to Step 2: Plans**.
Optionally, you can add further details to your service, such as *technical documentation*, *FAQs*, and *contact details* specific to the service.
If you are not ready to create a plan, you can choose to **Submit Description**, which allows you to publish without any Plans, or you can leave your Service as a draft by clicking on **Back to Provided Services**.
To learn more about adding plans please refer to [Add a Plan](/step-by-step/provide-a-service-on-the-marketplace/add-a-plan).
# Service Configuration
A service is the marketing representation of a product and its features.
## Create a new service
In My Hub, click **Add Service** in the top-right. In the subsequent popup, enter a Service Name and click **Add Service**.
The steps of creating the service and a plan is shown in the left side menu. **Catalog card**, **Service details**, and **Plans** are mandatory. The rest of the details are optional.
At the top of the screen, you find the Service Configuration toolbar, where you can **Save** as draft anytime and return to edit the details, before you proceed to **Publish** a service.
For each step, a checkmark indicates if all mandatory fields are filled out. Once these fields are completed for the mandatory steps, the service can be submitted for publishing.
## Catalog card
In this section, you can design the tile that will appear in the Catalog for consumers. A live preview is shown on the right side.
## Service details
In this section, you can design the service page that opens when someone clicks on the Catalog card.
This includes
* **visual settings** of the page header
* a selection of supported **countries** (optional, the default is *all countries*)
* detailed **description** (a longer text describing your service)
* product **images** (optional, any images, screenshots, etc you want to show)
A live preview is shown on the right side.
## Plans
To publish a service, you need to create at least one Plan. Please refer to the next article [Adding Plans](/step-by-step/provide-a-service-on-the-marketplace/add-a-plan) for details.
## Optional details
Optionally, you can add further details to your service, such as *Security & Compliance* certifications, customer *References*, *Technical documentation*, *FAQs*, and *Contact details* specific to the service.
{% hint style="warning" %}
After a service is **published**, editing the service details is disabled.
Only the **Plans** section remains editable for published services.
{% endhint %}
# Add a Plan
A plan is the commercial representation of a service. In a plan, you associate APIs to the service, and define the pricing and limits of consumption.
Having created a Service, click on **Continue to Step 2: Plans.** On the new page, you will find the **Add a Plan** button. Here you can add one or multiple plans for your Service.
Once you click on **Add a Plan**, you will be brought to a new page with several tabs. Please fill out the relevant information in each tab.
### General
Define your plan's name, service type, and approval process.
* When defining your **Plan Name**, please note that the plan name **cannot be changed** after the plan has been published.
* Mark the **Set as a Demo** checkbox if appropriate. A demo plan is a free plan to which users can subscribe so that they can try out your service (for example, for testing and integration purposes). Demo plans are highlighted in the marketplace. \
Setting a [rate limit](#limits) under *Limits and Pricing* is mandatory for Demo plans.
* If your service will be exclusively consumed via API calls, select the Service type **API**.
* For independent SaaS offerings, which will be consumed differently by your customers (e.g. via a combination of web application, mobile application, e-mail, etc.), select the Service type **Application**.
* You can enable **Subscription Approval** if you would like tighter control over your subscribers. This is Off by default, allowing everyone to subscribe to your publicly available plans. You will find the list of your subscribers and their contact details in the Subscribers section, irrespective of this setting.
{% hint style="info" %}
Application plans have no assigned APIs and limited pricing options.
The *cursive* sections below only apply to API plans.
{% endhint %}
### Permissions
Decide whether your plan is public or restricted.
* **Selected Workspaces** - can be offered individually to other Workspaces, otherwise hidden from the catalog. Your own workspace is included by default. If you don't add any further workspaces, the Plan will be private to your own workspace.
* **All Workspaces** - available for anyone to consume, publicly listed in the marketplace catalog.
### *Assign API to Plan*
Here you can select one or more APIs from your [API Collection](/step-by-step/provide-a-service-on-the-marketplace/add-an-api#api-collection). The *Limits and Pricing* section will parse the assigned APIs in order to provide granular configuration per endpoint and transactions.
### *Limits and pricing* / Pricing
#### *Transaction Configuration*
A transaction is a unit of measurement that can be used for your offered services' billing purposes. You can create multiple transactions for one service and refer to them while configuring your pricing plan.
* Click **Add Transaction**.
* Specify a Transaction Name.
* Select the Transaction Recognition Type (**Single Request** or **Response Header**).
* **Single Request** will count any request to a certain endpoint, followed by a specified server response (e.g. 200-203 as successful requests).
* **Response Headers** allow you to configure multiple endpoints. An additional ID needs to be added as a header. A response from any of the endpoints including this additional header value will be counted as a transaction.
* Select the appropriate Endpoint(s).
* For Single Request, define the HTTP Response Codes; for Response Header, define the Header Name and Value.
* Click **Add Transaction** to finish adding the transaction.
#### *Limits*
Limits can be defined for your pricing plan. E.g. "100 Requests per month."
* Click **Add Limit**.
* Under Amount, specify the maximum amount for this limit
* Under Unit, Requests are specified as the unit of measurement for the limit
* Under Period, specify the time interval for the limit.
#### Pricing
Define prices, such as an overall periodical fee, or a fee for each unit or for each transaction.
{% tabs %}
{% tab title="API Plans" %}
* **Price per period**:
* Under Amount, define the price that should be billed per period.
* Under Period, select the duration of one period.
* **Price per unit**:
* Under Amount, define the price for one unit.
* Under Unit, Requests are specified as the unit of measurement.
* Under Threshold, you can optionally define a starting point for tiered pricing. (e.g. a threshold of 50 means that the pricing will be applied from the 50th request onwards)
* **Price per transaction**:
* Under Amount, define the price for one transaction.
* Under Transaction, select the transaction for which this price should be billed.
* Under Threshold, you can optionally define a starting point for tiered pricing. (e.g. a threshold of 50 means that the pricing will be applied from the 50th transaction onwards)
{% endtab %}
{% tab title="Application Plans" %}
* **Price per period**:
* Under Amount, define the price that should be billed per period.
* Under Period, select the duration of one period.
* **Price per user**:
* Under Amount, define the price for one user.
* Under Threshold, define the lower limit of the threshold to which this price applies.
* **Price per setup**:
* Under Amount, define the price for one setup.
{% endtab %}
{% endtabs %}
### Contract
Upload a contract that describes the terms and conditions of the service you are providing.
#### Continue with Preview & Publishing
When you completed the service description and the setup of the plan(s), continue with publishing: [Preview & Publish your Services and Plans](/step-by-step/provide-a-service-on-the-marketplace/preview-and-publish-your-services-and-plans)
# Adding Plans
A plan is the commercial representation of a service. In a plan, you associate APIs to the service, and define the pricing and limits of consumption.
Having created a Service, you can create different Plans under the correspondig step by clicking **Add Plan**:
Setting up a plan will walk you through the following steps.
As with Services, each step indicates with a checkmark if all mandatory fields are filled out. Once all steps are completed, the Plan can be submitted for publishing.
## General Setup
Define your plan's name, service type, and approval process.
* When defining your **Plan Name**, please note that the plan name **cannot be changed** after the plan has been published.
* **Plan type** - if your service will be exclusively consumed via API calls, select the **API**.
* For non-API SaaS offerings select the Service type **Application**. See more about this option under [Services without APIs](/concepts/services-without-apis).
* Upload a **Contract** that describes the terms and conditions of the service you are providing. This is *mandatory* on marketplace.apinity.io for external customer facing services to be published in the Catalog.
## Permissions
Decide whether your plan is public or restricted.
* **Selected Workspaces** - can be offered individually to other Workspaces, otherwise hidden from the catalog. Your own workspace is included by default. If you don't add any further workspaces, the Plan will be private to your own workspace.
* **All Workspaces** - available for anyone to consume, publicly listed in the marketplace catalog.
Additionally, you can enable **Subscription Approval** if you would like tighter control over your subscribers. This is Off by default, allowing everyone to subscribe to your publicly available plans. You can read further about this feature under [Subscription approval](/step-by-step/provide-a-service-on-the-marketplace/subscription-approval).
## Manage API
{% hint style="info" %}
This step is only available if the selected Plan type is API.
Similarly, certain Limit & Pricing options are only available for API plans.
{% endhint %}
Here you can select one or more APIs from your [API Collection](/step-by-step/provide-a-service-on-the-marketplace/add-an-api#api-collection). The *Limits and Pricing* section will parse the assigned APIs in order to provide granular configuration per endpoint and transactions.
## Limits and pricing
### *Demo plan*
Mark the **Set as a Demo** checkbox if appropriate. A demo plan is a free plan to which users can subscribe so that they can try out your service (for example, for testing and integration purposes). Demo plans are highlighted in the marketplace. \
It is highly advised to set a [rate limit](#limits) for Demo plans!
### *Limits*
Limits can be defined for your pricing plan. E.g. "100 Requests per month."
* Click **Add Limit**.
* Under **Amount**, specify the maximum amount for this limit
* Under **Period**, specify the time interval for the limit. You can only specify one limit per period type.
### *Transaction Configuration*
A transaction is any specific HTTP endpoint and/or HTTP response, derived from the assigned API specification, that can be used for your offered services' billing purposes. You can create multiple transactions for one service and refer to them while configuring your pricing plan.
* Click **Add Transaction**.
* Specify a Transaction Name.
* Select the Transaction Recognition Type (**Single Request** or **Response Header**).
* **Single Request** will count any request to a certain endpoint, followed by a specified server response (e.g. 200-203 as successful requests).
* **Response Headers** allow you to configure multiple endpoints. An additional ID needs to be added as a header. A response from any of the endpoints including this additional header value will be counted as a transaction.
* Select the appropriate Endpoint(s).
* For Single Request, define the HTTP Response Codes; for Response Header, define the Header Name and Value.
* Click **Add Transaction** to finish adding the transaction.
### *Pricing*
Define prices, such as an overall periodical fee, or a fee for each unit or for each transaction.
The available currencies are pre-defined by the tenant administrator.
{% tabs %}
{% tab title="API Plans" %}
* **Price per period**:
* Under Period, select *Per Month* or *Per Year*.
* Under Amount, define the price that should be billed per period.
* **Price per Request**:
* Under Amount, define the price for one unit.
* **Price per Transaction**:
* Under Amount, define the price for one transaction.
* Click *Add transaction*, and select the transaction for which this price should be billed.
{% endtab %}
{% tab title="Application Plans" %}
* **Price per period**:
* Under Period, select *Per Month* or *Per Year*.
* Under Amount, define the price that should be billed per period.
* **Price per User**:
* Under Amount, define the price for one user.
* **Price per Setup**:
* Under Amount, define the price for one setup.
{% endtab %}
{% endtabs %}
## Complete & Close
When you completed the plan setup, you can continue with publishing: [Preview & Publish](/step-by-step/provide-a-service-on-the-marketplace/preview-and-publish-your-services-and-plans)
# Preview & Publish
# Preview
Once you have filled out all the required fields for the Service and a Plan, the **Submit** button will be active in the Service Configuration toolbar.
You can preview the **Catalog card** and the **Service details** respectively on the right side of the setup.
The **Plans** section will see all draft (and published) plans. You can expand or collapse any entry, and edit/delete unpublished ones.
At this point, you still have the opportunity to edit any information in your Service and its Plans. If you are ready to publish, click on **Submit** in the top toolbar.
# Submit
Once you click **Submit** on a Service configuration, you will be able to select which Plan(s) to include. If a plan is not *Ready to submit* , it is still missing some required information.
Select at least one plan, and click **Confirm** to submit the service for approval.
{% hint style="warning" %}
Once you have submitted your service / plan(s) for review, they **cannot be edited** any further.
{% endhint %}
You will receive an email when the status of your service changes. You can also see the status of your Services under the **Provided Services** section.
# Cancellation & Rejection
There are two ways in which the service and plans can be edited again before publication: you can cancel the review, or apinity rejects the service / plan(s).
### Cancel Review
If you would like to continue editing before publication, you may cancel the review at any time before it has been approved.
To cancel a **service** review, you may click on **Cancel Review** in two places:
* On the Provided Services page, at the top-right corner of the service card
* Within **Step 1: Service Description**, in the yellow banner at the top of the window
 / 
To cancel a **plan** review, you may click on **Cancel Review** in two places:
* Within **Step 2: Plans**, in the yellow banner at the bottom of the plan card
* Within Edit Plan, in the yellow banner at the top of the window
 / 
Once a review has been cancelled, you may continue editing your service / plan(s).
Once you have finished with your changes, please resubmit as described in the [Submission](/step-by-step/provide-a-service-on-the-marketplace/preview-and-publish-your-services-and-plans/submission) section.
### Rejection
apinity assists in curating your service and plan description / configuration before publication. Should we find an error or have a suggestion for improvement, we may reject the service / plan(s) from publication. A reason for rejection will always be shared on the service / plan card.
 / 
At this point, you may continue editing your service / plan(s). Please refer to [Add a Service](/step-by-step/provide-a-service-on-the-marketplace/add-a-service) and [Add a Plan](/step-by-step/provide-a-service-on-the-marketplace/add-a-plan) for more detailed information. In case of any questions concerning a rejection, please contact .
Once you have finished with your changes, please resubmit as described in the [Submission](/step-by-step/provide-a-service-on-the-marketplace/preview-and-publish-your-services-and-plans/submission) section.
# Edit existing Services or Plans
You can edit your service and its plan(s) by clicking on **My Hub** in the top menu and then **Provided Services** in the left menu. In the Provided Services section, you will find an overview of all your services.
Click on the service you wish to edit and you will be brought to the same pages as when you first created the service. Here you can edit or add any information.
{% hint style="warning" %}
The **service / plan name cannot be changed** after they were published.
{% endhint %}
{% hint style="info" %}
If your plan has active subscribers, the only possible change is to extend the permissions to additional Workspaces.
{% endhint %}
A **Visible** toggle is made available when you've published your plans. This toggle allows you to hide your plans from the marketplace catalog while still maintaining a deep link / direct URL to your published plan. This deep link can be saved and shared at your discretion. The **Visible** toggle can be turned on or off at any time. For more info, see [Visibility in the Catalog](/concepts/visibility-in-the-catalog).
Please refer to [Add a Service](/step-by-step/provide-a-service-on-the-marketplace/add-a-service) and [Add a Plan](/step-by-step/provide-a-service-on-the-marketplace/add-a-plan) for more detailed information about the different sections.
# Subscription approval
## Setup
Under the [**Permissions**](https://docs.apinity.io/step-by-step/provide-a-service-on-the-marketplace/pages/NAhcAlnM6F71wmDAw7Cv#addaplan-step2.2visibility) settings of a **Plan**, you can use the **Subscription Approval** toggle to specify whether you want to approve each subscription request manually before they go live.
{% hint style="warning" %}
Note that this setting cannot be changed after the plan is published.
{% endhint %}
If you enable Subscription Approval, you can specify additional questions. Subscribers must fill in the answers to these questions before they submit the subscription request. This is useful to gather initial information you will need to customize the subscription.
## Approving a request
When a consumer initiates a subscription request, the Workspace Contact and the Service Contact will receive an automated email about a pending subscription approval. The email contains details about the subscribing workspace and the user who initiated the subscription.
The email contains a direct link ("click *here* to review the request...") to the page where the approval can be actioned:
Pending approvals are also shown under the **Subscribers** section of **My Hub**. You can follow the arrow on the right side of each row to see the details of the subscription, and approve the pending ones.
# Subscribe and Consume a Service
## Quick Start
For a brief overview check out [Consume a Service - quick overview](/quick-start/consume-a-service-quick)
## Overview
**Definition**: Subscriptions are the contractual and technical relationship between a Consumer and a Provider. By subscribing to a service the consumer enters a relationship with the providers which is defined by the details of the plan and the service.
click image to enlarge
Subscriptions are the central entity for consuming services on the marketplace. The subscription (and its unique ID) represent one relationship between a provider and a consumer.
**Technical integration:** For each subscription, there is a unique technical ID and Base URL on the marketplace. This means, the technical integration will always remain the same, even if commercial aspects of the contract change.
**Consumer clients:** Consumers can manage access to their subscriptions via consumer clients. These are separately defined authentication keys that can be freely assigned/unassigned to subscriptions. One or more consumer clients can be assigned to one subscription, e.g. for granting access to the same service for individual teams or different applications. One consumer client can also be assigned to multiple subscriptions.
**Plans:** Plans determine the technical and commercial aspects of a service. Different plans can have different prices, limits or transactions. When subscribing, the consuming partner can chose the best fitting plan. The plan can be changed later without breaking the integration if both, provider and consumer agree.
# Subscribing to a Service
For a brief overview check out [Consume a Service - quick overview](/quick-start/consume-a-service-quick)
***
### Finding a Service
Navigating to brings you to the marketplace **Catalog**.
You can either browse through the listed Services, use the search bar to look for a specific Service, or filter by category or country using the dropdowns.\\
### Viewing Details of a Service
Clicking on a Service leads you to the service's Overview and Available Plans sections.
* **Overview** - this page contains the service description and feature details.
* **Available Plans** - this page contains an overview of all the available plans as well their respective Limits & Pricing, Documentation & Contract, and Swagger File.
 
### Ordering a Subscription
Once you have decided on the service and plan you want to subscribe to, click **Subscribe** in the Available Plans section of the service.
On the next page, you can review your order, as well as read the [apinity marketplace Terms of Service](https://marketplace.apinity.io/terms-and-conditions), the Terms of Service of the Service Provider, and the [Data Policy](https://marketplace.apinity.io/data-policy)
Click **Complete Order** to agree to the terms and data policy, and to subscribe.
### Setting up your Consumer Clients
After you completed a subscription, you will find the service under the **Subscriptions** section of My Hub. In order to consume the service, you must assign at least one Consumer Client. Under the **Technical Setup** of the service, you have the option to create a new consumer client, or assign an existing one.
{% hint style="info" %}
If this is your first time setting up a consumer client, please check the [Consumer Clients](/step-by-step/subscribe-and-consume-a-service/consumer-clients) article for more information.
{% endhint %}
If you have already set up Consumer Clients, you can choose **Assign/Unassign Clients** and select one or more of these.
If you need a new consumer client, you can choose **Create New & Assign**, or freely create new unassigned consumer clients under the **Consumer Clients** section of My Hub, by clicking **Create New Client**. Both will lead you to a similar dialogue window:
You can choose between a simple API key and OAuth for authentication. You can read more about these in the [Consumer Clients](/step-by-step/subscribe-and-consume-a-service/consumer-clients) article.
{% hint style="warning" %}
Make sure to **save the API Key or Client Secret** in a secure place as long as it is visible.\
Once you click on **Create Client**, you will no longer be able to view this API Key or Client Secret, and will have to generate a new one.
{% endhint %}
### Managing your Subscription
Once your subscription is active, you can click on it in the **Subscriptions** section to view the details of the subscription. Technical and business-related information is shown in separate tabs:
* **Technical Setup** (only for API services) - contains the Endpoint URL, consumer client settings, Swagger documentation, and additional technical documentation if provided.
* **Business Setup** - contains the plan, subscription period, pricing and contract. You can also unsubscribe from the service here.
### Using the APIs
With everything in place, you can now start consuming your subscribed Services. For more information, please see the [Consume an API (technical Implementation)](/step-by-step/subscribe-and-consume-a-service/consume-an-api-technical-implementation) article.
# Consumer Clients
## Overview
Consumer Clients are used to authenticate requests to a service you have subscribed to.
The same Consumer Client can be assigned to one or multiple subscriptions. In the case of multiple subscriptions, that single Consumer Client is then shared by whichever subscriptions they are added to, giving you the advantage of multiple services being integrated and consumed with a single authentication method and set of login credentials.
You can manage your clients on the **Consumer Clients** section of **My Hub.** The first table shows your *active* consumer clients; the second table shows clients that have been *revoked*.
You can create a new client anytime by clicking **Create New Client**.
Clicking on the icon on the right side of an existing Consumer Client opens a dropdown, where you can edit or revoke a client.
## **Authentication methods**
There are two types of consumer clients, based on the underlying authentication method:
1. **API-Key**\
Consumer Clients based on `API-Keys` will use a `/login` endpoint to authenticate against the marketplace. Within the response of this call, there is a static authorization token that can be used to consume the service (as an API-Key in the header).
2. **OAuth2**\
OAuth2 Consumer Clients are based on a `ClientId` and a `ClientSecret`. Calling the `/login` endpoint will return an OAuth token, and the same endpoint can be used to refresh the token.
You can select the authentication type while creating a consumer client:
{% hint style="warning" %}
**Note:** It is not possible to change the authentication type after the client has been created. In such case, please revoke the consumer client and create a new one with the correct type.
{% endhint %}
### API-Key
With this method, an **API key** is generated and displayed below the Name field. This API key is already base64 encoded and can be used without any further required action.
{% hint style="warning" %}
Make sure to **save the API Key** in a secure place as long as it is visible.\
Once you click on Create Client, you will no longer be able to view this API Key, and will have to generate a new key.
{% endhint %}
If you want to **Edit** the client later, you can
* rename the client
* generate a new API Key (but *not* view/copy the existing)
### OAuth2
With this method, a **Client ID** and a **Client Secret** is generated and displayed below the Name field
{% hint style="warning" %}
Make sure to **save the Client Secret** in a secure place as long as it is visible.\
Once you click on Create Client, you will no longer be able to view this secret, and will have to generate a new one.
{% endhint %}
If you want to **Edit** the client later, you can
* rename the client
* view and copy the Client ID (but *not* edit)
* generate a new Client Secret (but *not* view/copy the existing).
## Other Actions
### Assigning Consumer Clients to Subscriptions
In order to use an API, a consumer client must be assigned to a subscription. This process is described in detail in [Subscribing to a Service](/step-by-step/subscribe-and-consume-a-service/subscribing-to-a-service#subscribingtoaservice-settingupyourconsumerclients).
### Revoking Consumer Clients
Revoking a consumer client will invalidate the credentials of the client and will unassign it from all subscriptions. Revoked Consumer Clients are shown in the table at the bottom of the consumer clients page.
{% hint style="warning" %}
**Note:** Revoking a consumer client can’t be undone.
{% endhint %}
# Consuming an API (technical Implementation)
For API plans, with the information you find in the **Subscriptions** section, you can start implementing the necessary API calls in your application.
Use an API tool like [Postman](https://www.postman.com) or cURL-commands to try them out or to run a quick test.
{% hint style="warning" %}
The URL in the API calls **must always include** the **https\://** prefix, otherwise the API call will return a 404.
{% endhint %}
## Consuming a Service
To consume a service via the apinity marketplace, you need to have a Consumer Client for the authentication of your requests (Please refer to [Consumer Clients](/step-by-step/subscribe-and-consume-a-service/consumer-clients) for more information).
The first necessary step for the usage of every Service is the authentication to the API gateway. The gateway handles the authentication to the service provider automatically.
{% hint style="info" %}
The service provider may require additional authorization. In such case, API requests must carry two authorization tokens (one for the marketplace, and one for the provider). For more info, see the concept article about [Authorization](/concepts/authorization).
{% endhint %}
Depending on the authentication type, the connection can be established as described below.
### Connecting with API Key
Necessary for implementation are these two values:
* **Endpoint URL**: The Endpoint URL is the base URL for implementing every API Call. This is found in the **Technical Setup** of every subscribed API service under **Subscriptions**.
* **API Key**: The key is generated while creating a consumer client, and **can’t** be retrieved again after the consumer client has been saved. If you misplace it, you will need to generate a new key or create a new consumer client.
#### **Step 1: Login Call**
The first necessary API call is the `Login` needed for authentication against the apinity marketplace.
For this, use a `POST` to `https://api.marketplace.apinity.io/{EndpointURI}/login` with the following body as *raw JSON* request:
```
{"api-key": “API_KEY”}
```
{% hint style="info" %}
The key name in this JSON is always **api-key**, not the name of the consumer client.
{% endhint %}
**Example cURL:**
```
curl --location --request POST 'https://api.marketplace.apinity.io/hello-world/639041ec-a6ba-4684-b37e-10677d482eb7/login' \
--header 'Content-Type: application/json' \
--data-raw '{"api-key": "d2tzZW9rNmE5aGF4djNjYWVtZDhzb2hyNmZnZTpeWWdTdzJHRDNhI3BRRFVHT29jaF9tUjdkJHY="}'
```
If the Login Call is successful, you will receive a `200 OK` status response.
#### **Step 2: Extract access token from Login response**
In the **response** of this call, you will find the following information:
* `"expires_in": “expirationValue”` – Expiration time of the token in seconds
* `"access_token": "accessToken”` – The authorization token
**Example Response:**
```
{
"expires_in": 31536000,
"access_token": "Basic dnRsNnFpZXRqZG..."
}
```
{% hint style="info" %}
The access token has a lifetime of exactly one year. Subsequent login calls within this period will return the same token. After expiry, a new login call is required.
Ending a subscription also invalidates the token as soon as the subscription expires.
{% endhint %}
#### **Step 3: All further calls - input Authorization header in every header**
Now you are ready to implement all further calls specified in the Swagger documentation by the service provider. For all these calls, these authorization values you received from the Login call should be sent as **headers**:
* **`x-apx-authorization`**`: “accesstoken"` (**required**)
* `authorization: “providersAuthKey"` (optional)
**Example cURL**
```
curl --location --request GET 'https://api.marketplace.apinity.io/hello-world/639041ec-a6ba-4684-b37e-10677d482eb7/v0/hello' \
--header 'x-apx-authorization: Basic dnRsNnFpZXRqZG...' \
--header 'Content-Type: application/json'
```
***
### Connecting with OAuth2
Necessary for implementation are these three values:
* **Endpoint URL**: The Endpoint URL is the base URL for implementing every API call. This is found in the **Technical Setup** of every subscribed API service under **Subscriptions**.
* **Client Id**: This is generated together with the consumer client and is necessary for Authentication. You can look it up by clicking “edit” on the respective consumer client in the **Consumer Clients** section.
* **Client Secret:** The secret is generated together with the consumer client and **can’t** be retrieved again after the consumer client has been saved. If you misplace it, you will need to generate a new secret or create a new consumer client.
#### **Step 1: Login Call**
The first necessary API call is the `Login` needed for authentication against the apinity marketplace.
For this, use a `POST` to `https://api.marketplace.apinity.io/{EndpointURI}/login` with the following body as *x-www-form-urlencoded* request:
```
--header 'Content-Type: application/x-www-form-urlencoded' \
--data-urlencode 'grant_type=client_credentials' \
--data-urlencode 'client_id=CLIENT_ID' \
--data-urlencode 'client_secret=CLIENT_SECRET'
```
**Example cURL:**
```
curl --location --request POST 'https://api.marketplace.apinity.io/hello-world/639041ec-a6ba-4684-b37e-10677d482eb7/login' \
--header 'Content-Type: application/x-www-form-urlencoded' \
--data-urlencode 'client_id=7ajv2oqbzerjln2ydlf0j9raasmo' \
--data-urlencode 'client_secret=Y1NuQGpMKmFHeXhuN1FtSUJ2XjdDM0smRUlj' \
--data-urlencode 'grant_type=client_credentials'
```
If the Login call is successful, you will receive a `200 OK` status response.
#### **Step 2: Extract access token from Login response**
In the **response** of this call, you will find the following information:
* `"expires_in": expirationValue` – Expiration time of the OAuth token in seconds
* `"refresh_token_expires_in": refreshTokenExpiration` – Expiration time of the OAuth refresh token in seconds
* `"access_token": "accessToken”` The authorization token
* `"refresh_token": "refreshToken"` – The refresh token
**Example Response:**
#### **Step 3: All further calls - input Authorization header in every header**
Now you are ready to implement all further calls specified in the Swagger documentation by the service provider. For all these calls, the authorization information you received should be sent as **headers**:
* **`x-apx-authorization`**`: “bearerToken"` (**required**)
* `authorization: “providersAuthKey"` (optional)
**Example cURL**
```
curl -v --location --request GET 'https://api.marketplace.apinity.io/hello-world/639041ec-a6ba-4684-b37e-10677d482eb7/v0/hello' \
--header 'x-apx-authorization: Bearer eyJhbGciOiJSUzI1NiIsInR5cCIgOiAiSldUIiwia2lkIiA6ICJiNWdkTlRfYmZzSmVLUHhiUklQRGUzQnF5NWRQREU1REZfejZ4djVkdzFnIn0.eyJleHAiOjE2NzkwNjAyNTQsImlhdCI6MTY3OTA1OTk1NCwianRpIjoiMGU5OTZmNmEtYWM4NS00ZGRmLWE4OTEtMGFmMTM3ODgxMjgyIiwiaXNzIjoiaHR0cHM6Ly9hdXRoLmFwaW5pdHkuaW8vcmVhbG1zL3N5bmNpZXItbWFya2V0cGxhY2UtZW5naW5lIiwiYXVkIjoiYWNjb3VudCIsInN1YiI6ImQwYjZlODRhLWNmMGItNGU4Yi05MzkzLWYxNzYyNTk5YWE1MyIsInR5cCI6IkJlYXJlciIsImF6cCI6Im1hcmtldHBsYWNlLWdhdGVrZWVwZXIiLCJzZXNzaW9uX3N0YXRlIjoiMTFmNDhjOTgtODhkNC00ODg3LThiMDYtM2M2ZTQ1NDNjMmZjIiwicmVhbG1fYWNjZXNzIjp7InJvbGVzIjpbIm9mZmxpbmVfYWNjZXNzIiwidW1hX2F1dGhvcml6YXRpb24iXX0sInJlc291cmNlX2FjY2VzcyI6eyJhY2NvdW50Ijp7InJvbGVzIjpbIm1hbmFnZS1hY2NvdW50IiwibWFuYWdlLWFjY291bnQtbGlua3MiLCJ2aWV3LXByb2ZpbGUiXX19LCJzY29wZSI6InByb2ZpbGUgZW1haWwiLCJzaWQiOiIxMWY0OGM5OC04OGQ0LTQ4ODctOGIwNi0zYzZlNDU0M2MyZmMiLCJlbmdpbmUtdXNlcm5hbWUiOiJha28xbGV0a254OGN3Mm44bmFzYTRjdmF6aHN0IiwiZW1haWxfdmVyaWZpZWQiOnRydWUsInBhcnRuZXItbmFtZSI6IkJhbGF6cyBDUyBUZXN0IiwiZW5naW5lLXBhc3N3b3JkIjoicWU1RlZVYTRMUHExIW5aKEx3aypLYnh5VCNKIiwicHJlZmVycmVkX3VzZXJuYW1lIjoiN2FqdjJvcWJ6ZXJqbG4yeWRsZjBqOXJhYXNtbyIsImVuZ2luZS1hdXRoLXR5cGUiOiJPQVVUSDIifQ.bO67OyNubiJHKWXeZ_VDh4a0pZZ0eep0V1uFssZP6nYyssZfH_qg6ed1jrgCl-heMQ7EyzoN4UuQlxXKXV_-N6g-ExhtMyDOIYpm9Hy6_DAF3-1AUM1mhodS38xwPA-H2eco5k8VqJTf5L99cpTuCvVGGg5wWvHEv5MlPOj_MpCrA8AvdhR6l2g4Pfjeh186k9qHFW0cwYTL54SDZX2iJOyCLiX0o0qyA6_jM3HKn_9m3MLGPyCNqDCqFTdOcbFkRGDlkd5Ib-6c-MkOb0CVa7AMtNW4_87a7dc_elnTj0_fzUVEVqOb1RMFT9eufkQgBzUdRe9Icb3EUaDT6RkfCg' \
--data-raw ''
```
**Refreshing an expired OAuth2 Token**
The OAuth2 tokens used by the marketplace expire after a while (time in seconds is specified in the /token endpoint response) and need to be refreshed by using the refresh token. Refreshing the token works by sending another `POST` request to the same endpoint:
**URL:** `https://api.marketplace.apinity.io/{EndpointURI}/login`
**Method:** `POST`
**Content Type:** `application/x-www-form-urlencoded`
**Form Data:**
```
--header 'Content-Type: application/x-www-form-urlencoded' \
--data-urlencode 'grant_type=refresh_token' \
--data-urlencode 'refresh_token=Bearer ...' \
```
This request will return a response with a new access token and refresh token:
```
{
"access_token": "Bearer eyJhbGciOiJSUzI1NiIsInR5cCIgOiAiSldUIiwia2lkIiA6ICJiNWdkTlRfYmZzSmVLUHhiUklQRGUzQnF5NWRQREU1REZfejZ4djVkdzFnIn0.eyJleHAiOjE2NzA0MTMyOTAsImlhdCI6MTY3MDQxMjk5MCwianRpIjoiNGM0ZDBjZDctMDBhNC00NjdjLWI4NGYtMTRlZWYwNmFkZTM4IiwiaXNzIjoiaHR0cHM6Ly9hdXRoLmFwaW5pdHkuaW8vYXV0aC9yZWFsbXMvc3luY2llci1tYXJrZXRwbGFjZS1lbmdpbmUiLCJhdWQiOiJhY2NvdW50Iiwic3ViIjoiZDBiNmU4NGEtY2YwYi00ZThiLTkzOTMtZjE3NjI1OTlhYTUzIiwidHlwIjoiQmVhcmVyIiwiYXpwIjoibWFya2V0cGxhY2UtZ2F0ZWtlZXBlciIsInNlc3Npb25fc3RhdGUiOiIxMmVkOWQ1NS01MTM1LTQzZWUtOTMxZC1iYjY3NWFkNWUyOWYiLCJhY3IiOiIxIiwicmVhbG1fYWNjZXNzIjp7InJvbGVzIjpbIm9mZmxpbmVfYWNjZXNzIiwidW1hX2F1dGhvcml6YXRpb24iXX0sInJlc291cmNlX2FjY2VzcyI6eyJhY2NvdW50Ijp7InJvbGVzIjpbIm1hbmFnZS1hY2NvdW50IiwibWFuYWdlLWFjY291bnQtbGlua3MiLCJ2aWV3LXByb2ZpbGUiXX19LCJzY29wZSI6InByb2ZpbGUgZW1haWwiLCJlbmdpbmUtdXNlcm5hbWUiOiJha28xbGV0a254OGN3Mm44bmFzYTRjdmF6aHN0IiwiZW1haWxfdmVyaWZpZWQiOnRydWUsInBhcnRuZXItbmFtZSI6IkJhbGF6cyBDUyBUZXN0IiwiZW5naW5lLXBhc3N3b3JkIjoicWU1RlZVYTRMUHExIW5aKEx3aypLYnh5VCNKIiwicHJlZmVycmVkX3VzZXJuYW1lIjoiN2FqdjJvcWJ6ZXJqbG4yeWRsZjBqOXJhYXNtbyIsImVuZ2luZS1hdXRoLXR5cGUiOiJPQVVUSDIifQ.G2Gx9sPgOsgXVtkBJ68f8U2VgV8FYXlMN0nUlF4eL_SohRtqrXq3yCzm0HD8xjAIBn6JyanqPf3RRemlkCl1mR_45jdspGZwe6rx1NB_LfktKDGYEpuj8bDuLYbnyqXZEUK-KA5LvfbUU3Ys69Fhl7pLqSenRLZelhL_ysVU0lMXonPkoGNRu4wTSqafF3tky4DC5lMwZ-qBfGnAIdi6MmEwFxQe2PlNquvtaCoueA5jVdtknXD75Gq8UL1zRNCtJ8o8LYvgI3dWt-e4URCLl7YpiCnTmdqxn0hOXQQM5c9mA6VXi-elKKcqT15bB0cR_QpOjBV7FjOwDlOC5SpL5g",
"refresh_token": "Bearer eyJhbGciOiJIUzI1NiIsInR5cCIgOiAiSldUIiwia2lkIiA6ICI5MGU2YWU5MS01YTRjLTQyZWEtOGZhNy03OTgyMDc2ZTEwYTIifQ.eyJleHAiOjE2NzA0MTQ3OTAsImlhdCI6MTY3MDQxMjk5MCwianRpIjoiNjM2M2Q1OTMtNmNlMS00ZWY0LTgyMzUtYWI4NjM0Y2QxZGVkIiwiaXNzIjoiaHR0cHM6Ly9hdXRoLmFwaW5pdHkuaW8vYXV0aC9yZWFsbXMvc3luY2llci1tYXJrZXRwbGFjZS1lbmdpbmUiLCJhdWQiOiJodHRwczovL2F1dGguYXBpbml0eS5pby9hdXRoL3JlYWxtcy9zeW5jaWVyLW1hcmtldHBsYWNlLWVuZ2luZSIsInN1YiI6ImQwYjZlODRhLWNmMGItNGU4Yi05MzkzLWYxNzYyNTk5YWE1MyIsInR5cCI6IlJlZnJlc2giLCJhenAiOiJtYXJrZXRwbGFjZS1nYXRla2VlcGVyIiwic2Vzc2lvbl9zdGF0ZSI6IjEyZWQ5ZDU1LTUxMzUtNDNlZS05MzFkLWJiNjc1YWQ1ZTI5ZiIsInNjb3BlIjoicHJvZmlsZSBlbWFpbCJ9.yEST66fJA0SSkl6mqHKVu9wsxk_I7asx1LkELxVuWfs",
"refresh_token_expires_in": 1800,
"expires_in": 300
}
```
## Testing a Service
#### Performance Test
For performance testing, we offer two helpful pieces of information in the response header of every call:
* `X-Kong-Upstream-Latency`: Value in ms
This value shows how long the service provider takes to handle the API call (\*1).
* `X-Kong-Proxy-Latency`: Value in ms
This value shows how long the marketplace engine / API Gateway takes to handle the API call (\*2).
# Visibility in the Catalog
You have several options to determine the visibility of your service, and of individual plans. This article explains these settings, and gives you a checklist to help your service appear publicly in the [Catalog](https://marketplace.apinity.io/catalog).
### **Service Visibility toggle**
This toggle on each Service card under Services, defines globally whether the service can appear in the Catalog.
If switched off, the service is accessible only via direct link. The direct link can be found by opening the description page with the button . Anyone with this link can access the service page.\
\
For more info, see [Add a Service](/step-by-step/provide-a-service-on-the-marketplace/add-a-service).
### **Plan Visibility**
You can additionally toggle the visibility of individual Plans in the Plans section of the Service Configuration.
This option can be used to retire plans without ending the existing subscriptions. Hidden plans will not appear to any consumer (irrespective of permissions), and cannot be subscribed to. Existing subscription to the plan will keep working.
Visible plans will adhere to the permissions shown in the next step.
### **Plan Permissions**
On individual Plans, you can define who is allowed to see them (and hence, subscribe).
You can use "*Selected Workspaces*" to offer tailored pricing, limits, or even custom API backend, to specific customers. It is also well suited for test plans (limiting to your own workspace).
"*All Workspaces*" will display the plan in the public catalog.\
\
For more info, see [Add a Plan](https://docs.apinity.io/concepts/pages/9kYEWHYVB1HHM6XvmXOR#addaplan-step2.2visibility).
{% hint style="success" %}
In order to appear in the public catalog
* a **Service** must be set to **Visible**, and
* at least **one Plan**\
\- must be set to **Visible**, and\
\- must be permissioned to **All Workspaces**.
{% endhint %}
# Services without APIs
Certain services may not be fully REST API-based. Their usage may involve other technologies, like a web UI, a mobile app, webhooks, SDKs or other software components. The service may also use other API protocols, e.g. GraphQL or SOAP. It may be that the service is REST API based but some parts are not fully compatible with apinity XPlore yet.
For such services, you can create **Application Plans** by selecting the corresponding Plan Type during the [plan setup](https://docs.apinity.io/concepts/pages/9kYEWHYVB1HHM6XvmXOR#addaplan-step2.1servicetype).
Application plans have limited configuration, hiding the REST API related technical setup, and related transactional pricing and limits.
You may want to combine an Application Plan later with API Plans, if parts of your service can be used via REST API, and you want to benefit from the API management and quality-of-life features apinity XPlore offers.
You can read more about this topic in our article [**Add a Plan**](/step-by-step/provide-a-service-on-the-marketplace/add-a-plan).
# Authorization
To [consume a subscribed API](/step-by-step/subscribe-and-consume-a-service/consume-an-api-technical-implementation) service, certain authentication and authorization is always necessary. The exact implementation depends on the service provider.
apinity offers two options to providers to manage authorization: either by implementing seamless **Access Control** between the gateway and the API server, or by requiring **pass-through authorization** directly from the subscribers.
Irrespective of the providers' choice, subscribers will always have to authenticate to the gateway itself using a valid **Consumer Client**.
This article describes each part of the authorization chain.
### 1. Consumer Client
For each subscription, at least one [Consumer Client](/step-by-step/subscribe-and-consume-a-service/consumer-clients) must be assigned. Each subscription also has a unique Base URL through which the API service can be consumed.
A successful **login call** with the Consumer Client to an assigned service (baseURL), with a valid subscription, will return a JWT **token**.
This **token** must be included in all subsequent requests in the **`x-apx-authorization`** header. Without the token, the gateway will return a `401 Unathorized` response instead. If the header is present, but the token is incorrect, the gateway response is `403 Forbidden`. In both cases, the gateway will not forward the request to the provider, acting as the first line of security check.
(The consumer token can also be sent in the **`Authorization`** header instead of `x-apx-authorization`, if that header is not needed for pass-through authorization (2b). In this case, the gateway consumes the Authorization header and replaces it with the access control (2a), or deletes it altogether before forwarding the request to the provider.)
### 2a. Access Control
With an [Access Control](/step-by-step/provide-a-service-on-the-marketplace/add-an-api#access-control), providers can set up a persistent authorization between the apinity gateway and their API server. This setup will handle a pre-defined authentication loop seamlessly for every request coming from subscribers, and **inject** (and replace!) the **`Authorization`** header when the request leaves the gateway.
If an Access Control is used, subscribers generally don't have to submit any further authorization directly to the provider. The gateway adds special headers that uniquely identify the subscriber. This allows providers to set up individual processing logic and data separation per customer, without having to rely on individual authentication. The need for a successful consumer client authentication (see step 1.) ensures that only valid requests will be forwarded.
**Pros:** \
\- Consumers have to use less authorization credentials in API requests. \
\- Providers don't have to manage individual credentials directly with consumers. \
\- Supports the safest standard methods, e.g. OAuth2.
**Cons:** \
\- Pre-defined choice of authentication methods. \
\- Little support for custom parameters.
### 2b. Pass-through authorization
If persistent Access Control is not desired by a service provider, or the API service uses a non-standard method of authorization (e.g. query parameter, custom value in the request body, custom fields in OAuth login), consumers can use individual authorization agains the API server.
In this case, providers will hand out the necessary credentials and inform the subscribers individually how to submit credentials in their API requests. Assuming that the request carries a valid consumer client (see step 1.), the gateway forwards the request to the API server unmodified, including any kind of authorization data.
**Pros:** \
\- Allows any custom authorization method. \
\- Allows providers stricter individual credential management.
**Cons:** \
\- Providers *and* subscribers have increased overhead to manage credentials. \
\- Each API request must carry two pieces of authorization (consumer client + provider auth).
# Get help
## Email
We are happy to answer your questions on the following email addresses:
* for business related questions (billing, pricing, etc.)
* for technical questions and to report technical problems
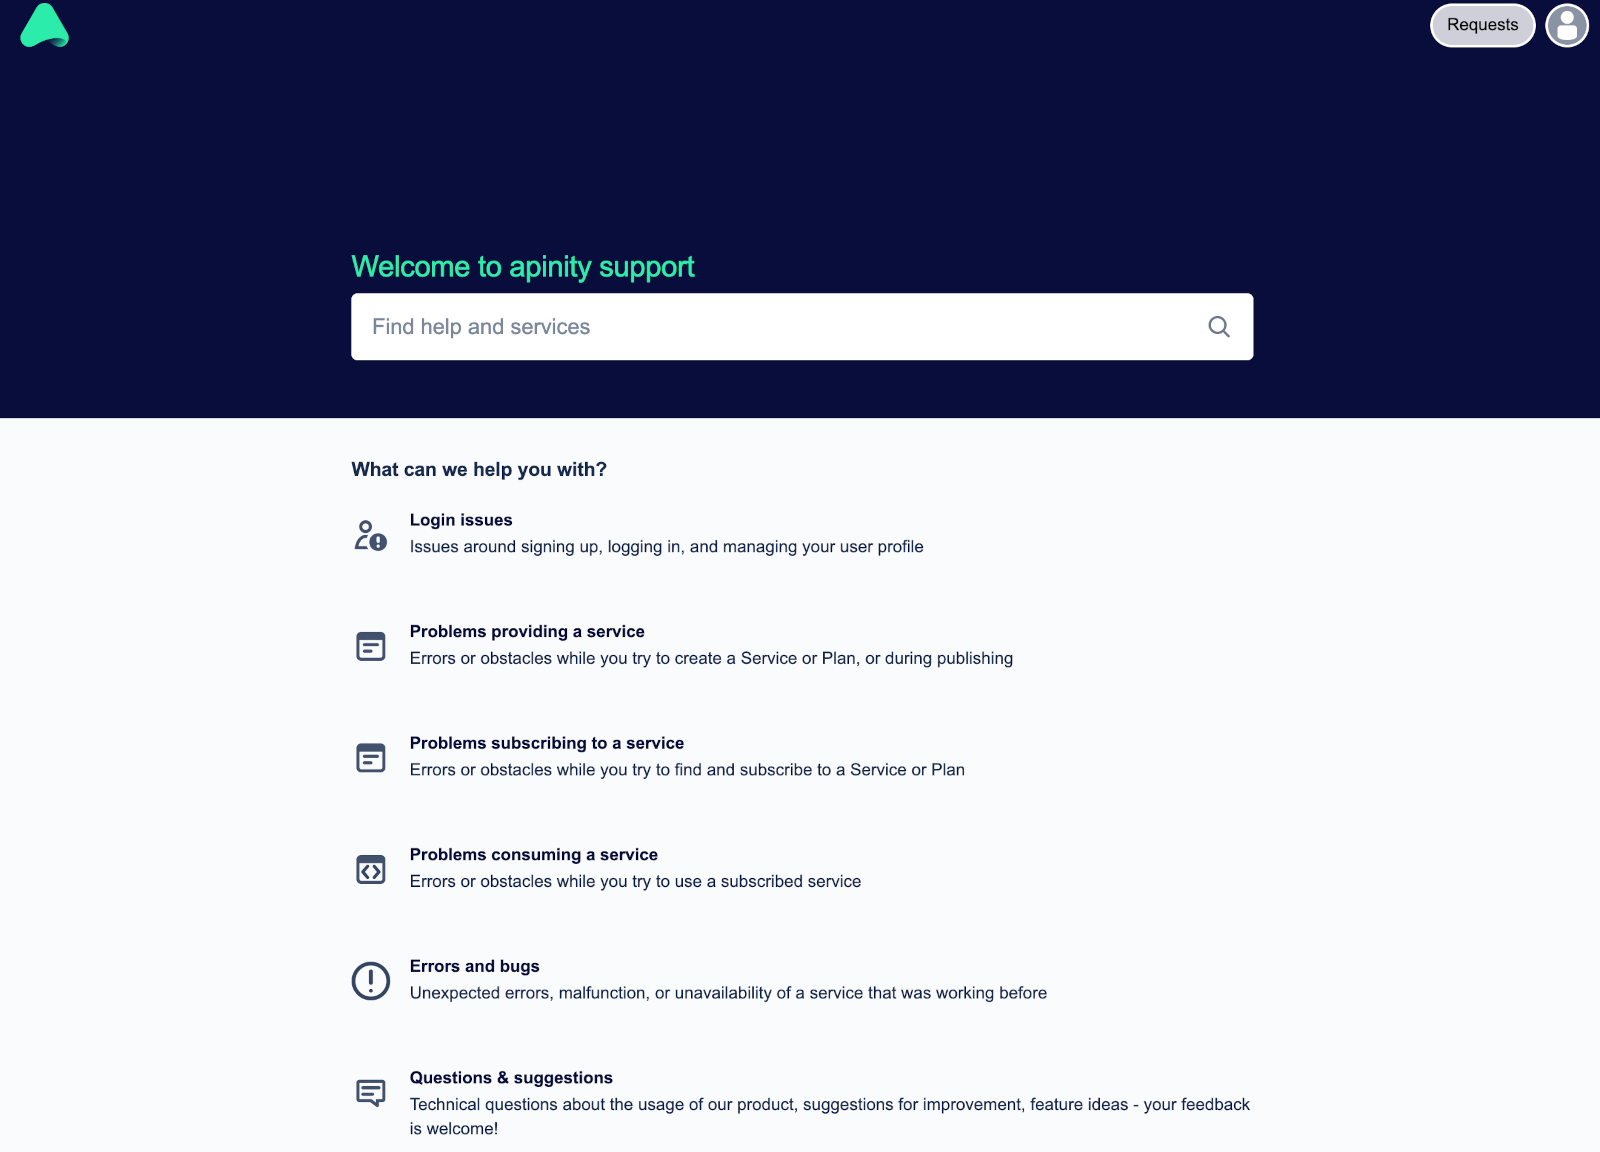
## Support portal
You can find our technical support portal under [**support.apinity.io**](http://support.apinity.io).
### User account
The portal has a standalone user account which is not linked with your apinity user account. This ensures that you can reach us even if you have problems accessing the apinity services.
Your portal user account will be created during onboarding, or after you contact us per email.
Once the account is created, you will receive an automated e-mail with instructions how to log in and create a password.
### Managing your tickets
Subsequently, you can use the customer portal to open and track support tickets.
If you already have an account and write an e-mail to , it will also automatically generate a new support ticket.
### Benefits of using the support portal
* You can see your previous and current tickets via **Requests** in the top right corner.
* Ongoing tickets will keep you up to date with immediate email notifications.
* You can specify more details of the case (broad category, priority, etc.) which helps our initial response, and ensures that we already have enough information to start investigating.
* We can track the time taken for response and resolution.
* If your company has multiple users on our platform, you can choose to have a shared view of the tickets.
# apinity.io
If you are interested to learn more about our company and products, visit [**https://apinity.io/**](https://apinity.io/)
The website offers you further options to get in touch with us or to book a demo.
# apinity-xplore.io
If you are interested to learn more about the apinity | Xplore marketplace, visit [**https://apinity-xplore.io**](https://apinity-xplore.io)
The website offers you further options to get in touch with us or to book a demo.
# About the release notes
Welcome to our history of releases! It is an exciting journey, which we are happy to share with you.
The list is an **overview of features and bugfixes** released in a given month. There may have been multiple smaller releases within the time period, which we combine in one article.
Not every minor detail is listed, only the highlights, which impact the user experience, and can be easily recognized by our end users. We don't detail many ongoing functional improvements, dependency upgrades, minor fixes in the backend, but you can be sure there are many little developments under the hood every month.
# 2024 July
## :tada: Major updates
* :ninja: preparing something awesome for August.. stay tuned!
## :tools: Improvements & fixes
* Improved the Acces Control assignment logic and UI.
* Improved the Access Control dialogue within the API setup screen.
* ...and many more.
# 2024 June
## :tools: Improvements & fixes
* Fixed a bug with "Manage plans" button in Services overview.
* Fixed Date/Time validation in the API status announcement dialogue.
* Fixed a bug with the validation of service names that begin with numbers.
* ...and many more.
# 2024 May
## :tada: Major updates
### Milestone feature: *API status* :tada:
Providers have now the option to set **statuses on published APIs** (Operational, Degraded, Major Outage, Maintenance). Service subscribers will be informed of status changes automatically, and can thus be informed of ongoig incidents as well as planned downtimes, all within the portal UI. A status history of individual APIs, as well as a live overview of all consumed/provided APIs is also available.
### Further feature releases
* Hugely improved the portal's UI with a **center stage layout.**
## :tools: Improvements & fixes
* A new Data Insights section was introduced to the left hand menu of My Hub.
* Added notification to workspace owners if another owner deletes the workspace.
* Improved plan cancellation workflow and user experience.
* Fixed redirection when logging in from certain subpages.
* Fixed a bug with frozen Manage Plans button on Service cards under certain conditions.
* ...and many more.
# 2024 April
## :tada: Major updates
* Providers can now define **additional questions during the subscription workflow.** Consumers must fill in the required information before their subscription gets approved. This helps providers gather important standard information for customized service setup.
* It is now possible for users to **delete owned workspaces**, assuming there are no more active subscribers and subscribed services.
* Besides manually picked service collections, it is now also possible to define **dynamic collections** based on certain service parameters such as Categories or Countries.
## :tools: Improvements & fixes
* Hide upstream server URL from the consumer-facing / catalog view of services.
* Improved user experience of the APIs page under My Hub.
* Fixed the Workspace Details' address fields to accept non-numeric characters in post code and street number.
* Improved the sorting of the Subscriptions table under My Hub.
* Improved the workflow of API deletion.
* Fixed an issue where too many uploaded documents flowed out of the service page.
* Hugely improved the performance of lookups in the Admin Area.
# 2024 March
## :tools: Improvements & fixes
* Improved subscriber-side view of the subscription approval loop.
* Improved provider-side view of the subscription approval loop.
* Reworked the page header layout to improve responsiveness and user experience.
* Improved the UI for creating service collections.
* Plan Contracts part is now shown dynamically if there is a contract.
* ...and many more.
# 2024 February
## :tada: Major updates
* It is now possible to **update API specification** of APIs associated to subscribed plans. This allows minor version updates without having to roll out a new plan.
## :tools: Improvements & fixes
* Improved scaling of Analytics dashboards.
* Workspace Users page now reloads properly when switching between workspaces.
* Short Collection names (1-2 characters) are now accepted.
* The Subscriptions page in My Hub is now a list instead of cards, making the UI more consistent.
* Fixed inconsistent site behavior for users without a workspace navigating the catalog.
* Invalid baseURLs are now handled better during API upload.
* ...and many more.
# 2024 January
## :tada: Major updates
### Milestone feature: *Collections* :tada:
We introduced **Catalog Collections**. This allows administrators to create hand picked collections out of the published services in the Catalog, with thematic banner and visual configuration for each collection. Collections get unique URLs, offering easy promotion and sharing.
### Further feature releases
* We enabled administrators to create a **catalog banner**. This is a customizable banner over the global catalog, providing an additional way to visually tailor your SaaS tenant's external catalog.
* Providers can now **Contact subscribers** directly from the Subscribers dashboard.
## :tools: Improvements & fixes
* Fixed a UI bug in the Access Controls table, where entries with long names spilled out of column.
* Fixed several places in the UI where recent changes were not visible without a forced page refresh.
* Since plan contracts were made optional, the UI still showed a broken placeholder on each plan. This was now fixed, plans without contracts don't show the Contract section anymore.
* Administrators can now invite themselves to workspaces in their tenant. Until now, they could only invite other users.
* ...and many more.
# 2023 November
## :tada: Major updates
* The **FAQ section** of your services is now easier to edit and reorder.
* Tenant administrators can now **invite new users** to any workspace in the tenant.
* Uploading **contracts** to plans is now optional (does not apply to marketplace.apinity.io).
## :tools: Improvements & fixes
* Renamed "API Collection" menu to "APIs" to avoid confusion of its function.
* Corrected example cURLs under Subscriptions.
* Improved the dialog for creating Consumer Clients.
* Fixed a bug that caused a hang-up during the creation / assignment of Consumer Clients.
* Fixed an alignment issue in the Tools & Resources menu.
* Improved pop-up notifications.
* ...and many more.
# 2023 October
## :tada: Major updates
### *Milestone feature*: reworked authorization header :tada:
We made **direct authorization** to the provider endpoints possible. Providers can now use the `authorization` header to expect tokens directly from consumers. The token from the initial gateway login will then use the new `x-apx-authorization` header instead. \
This *does not break existing subscriptions*, consumption can also be carried on using the original authorization header.
### Further feature releases
* We added a **step-by-step guide for subscribers** how to consume subscribed services. The Technical Setup section of your subscriptions now shows the necessary steps to make a successful API call, along with dynamically generated cURL examples.
* The interface now supports **multiple currencies** for the pricing of plans. Tenant administrators can define in the Admin Area which currencies should be available for all workspaces.
* It is now possible to **delete APIs** from your API collection, as long as they are not assigned to any live plan.
* Administrators can now see the **list of users** for every workspace in their tenant.
## :tools: Improvements & fixes
* The Workspace Users list now also shows the email address for each user.
* The parser for uploaded APIs will now give you more detailed error descriptions.
* Improved the workspace selection drop-down by pinning the active workspace to the top of the list, and included a direct link to manage the users of the active workspace.
* Increased character limit for API keys used as Consumer Clients.
* Fixed the mail delivery of subscription approval requests to providers.
* ...and many more.

 ](https://docs.apinity.io/quick-start/publish-your-first-service-quick) | [
 ](https://docs.apinity.io/quick-start/consume-a-service-quick) |
| :------------------------------------------------------------------------------------------------------------------------------------------------------------------------------------------------------------------------------------------------------------------------------------------------------------------------------: | :---------------------------------------------------------------------------------------------------------------------------------------------------------------------------------------------------------------------------------------------------------------------------------------------------------------------: |
| If you want to **publish a service** on the portal, use this quick start guide to create a service and a demo plan. | If you want to **subscribe to an existing service** on the portal, use this quick start guide on subscribing to a service. |
# Publish a service
Quick overview
**Steps to publish a service:**
](https://docs.apinity.io/quick-start/consume-a-service-quick) |
| :------------------------------------------------------------------------------------------------------------------------------------------------------------------------------------------------------------------------------------------------------------------------------------------------------------------------------: | :---------------------------------------------------------------------------------------------------------------------------------------------------------------------------------------------------------------------------------------------------------------------------------------------------------------------: |
| If you want to **publish a service** on the portal, use this quick start guide to create a service and a demo plan. | If you want to **subscribe to an existing service** on the portal, use this quick start guide on subscribing to a service. |
# Publish a service
Quick overview
**Steps to publish a service:**


 Please be sure to click **Save Changes** when you are finished with your changes.

# Change your Password
If at any point, you would like to change your password, please click on your profile picture icon in the top-right corner and select **Change Password**.

In the popup window, click **Continue** to receive an email with a link to trigger the password update.
In the email, click on the **Set new Password** option.
You will be redirected to the apinity marketplace with a dialogue to update the password:

{% hint style="info" %}
Use 8+ characters including both upper and lowercase, at least 1 number, and 1 special character in your password.
Your new password must not be the same as any used password.
{% endhint %}
# Reset your Password
If you happen to forget you password, it’s possible to reset it.
On the marketplace main page, click **Log in** in the upper right-hand corner, then click on the **Reset Password** link.
Please be sure to click **Save Changes** when you are finished with your changes.

# Change your Password
If at any point, you would like to change your password, please click on your profile picture icon in the top-right corner and select **Change Password**.

In the popup window, click **Continue** to receive an email with a link to trigger the password update.
In the email, click on the **Set new Password** option.
You will be redirected to the apinity marketplace with a dialogue to update the password:

{% hint style="info" %}
Use 8+ characters including both upper and lowercase, at least 1 number, and 1 special character in your password.
Your new password must not be the same as any used password.
{% endhint %}
# Reset your Password
If you happen to forget you password, it’s possible to reset it.
On the marketplace main page, click **Log in** in the upper right-hand corner, then click on the **Reset Password** link.


 indicates if all mandatory fields are filled out. Once these fields are completed for the mandatory steps, the service can be submitted for publishing.
## Catalog card
In this section, you can design the tile that will appear in the Catalog for consumers. A live preview is shown on the right side.
indicates if all mandatory fields are filled out. Once these fields are completed for the mandatory steps, the service can be submitted for publishing.
## Catalog card
In this section, you can design the tile that will appear in the Catalog for consumers. A live preview is shown on the right side.

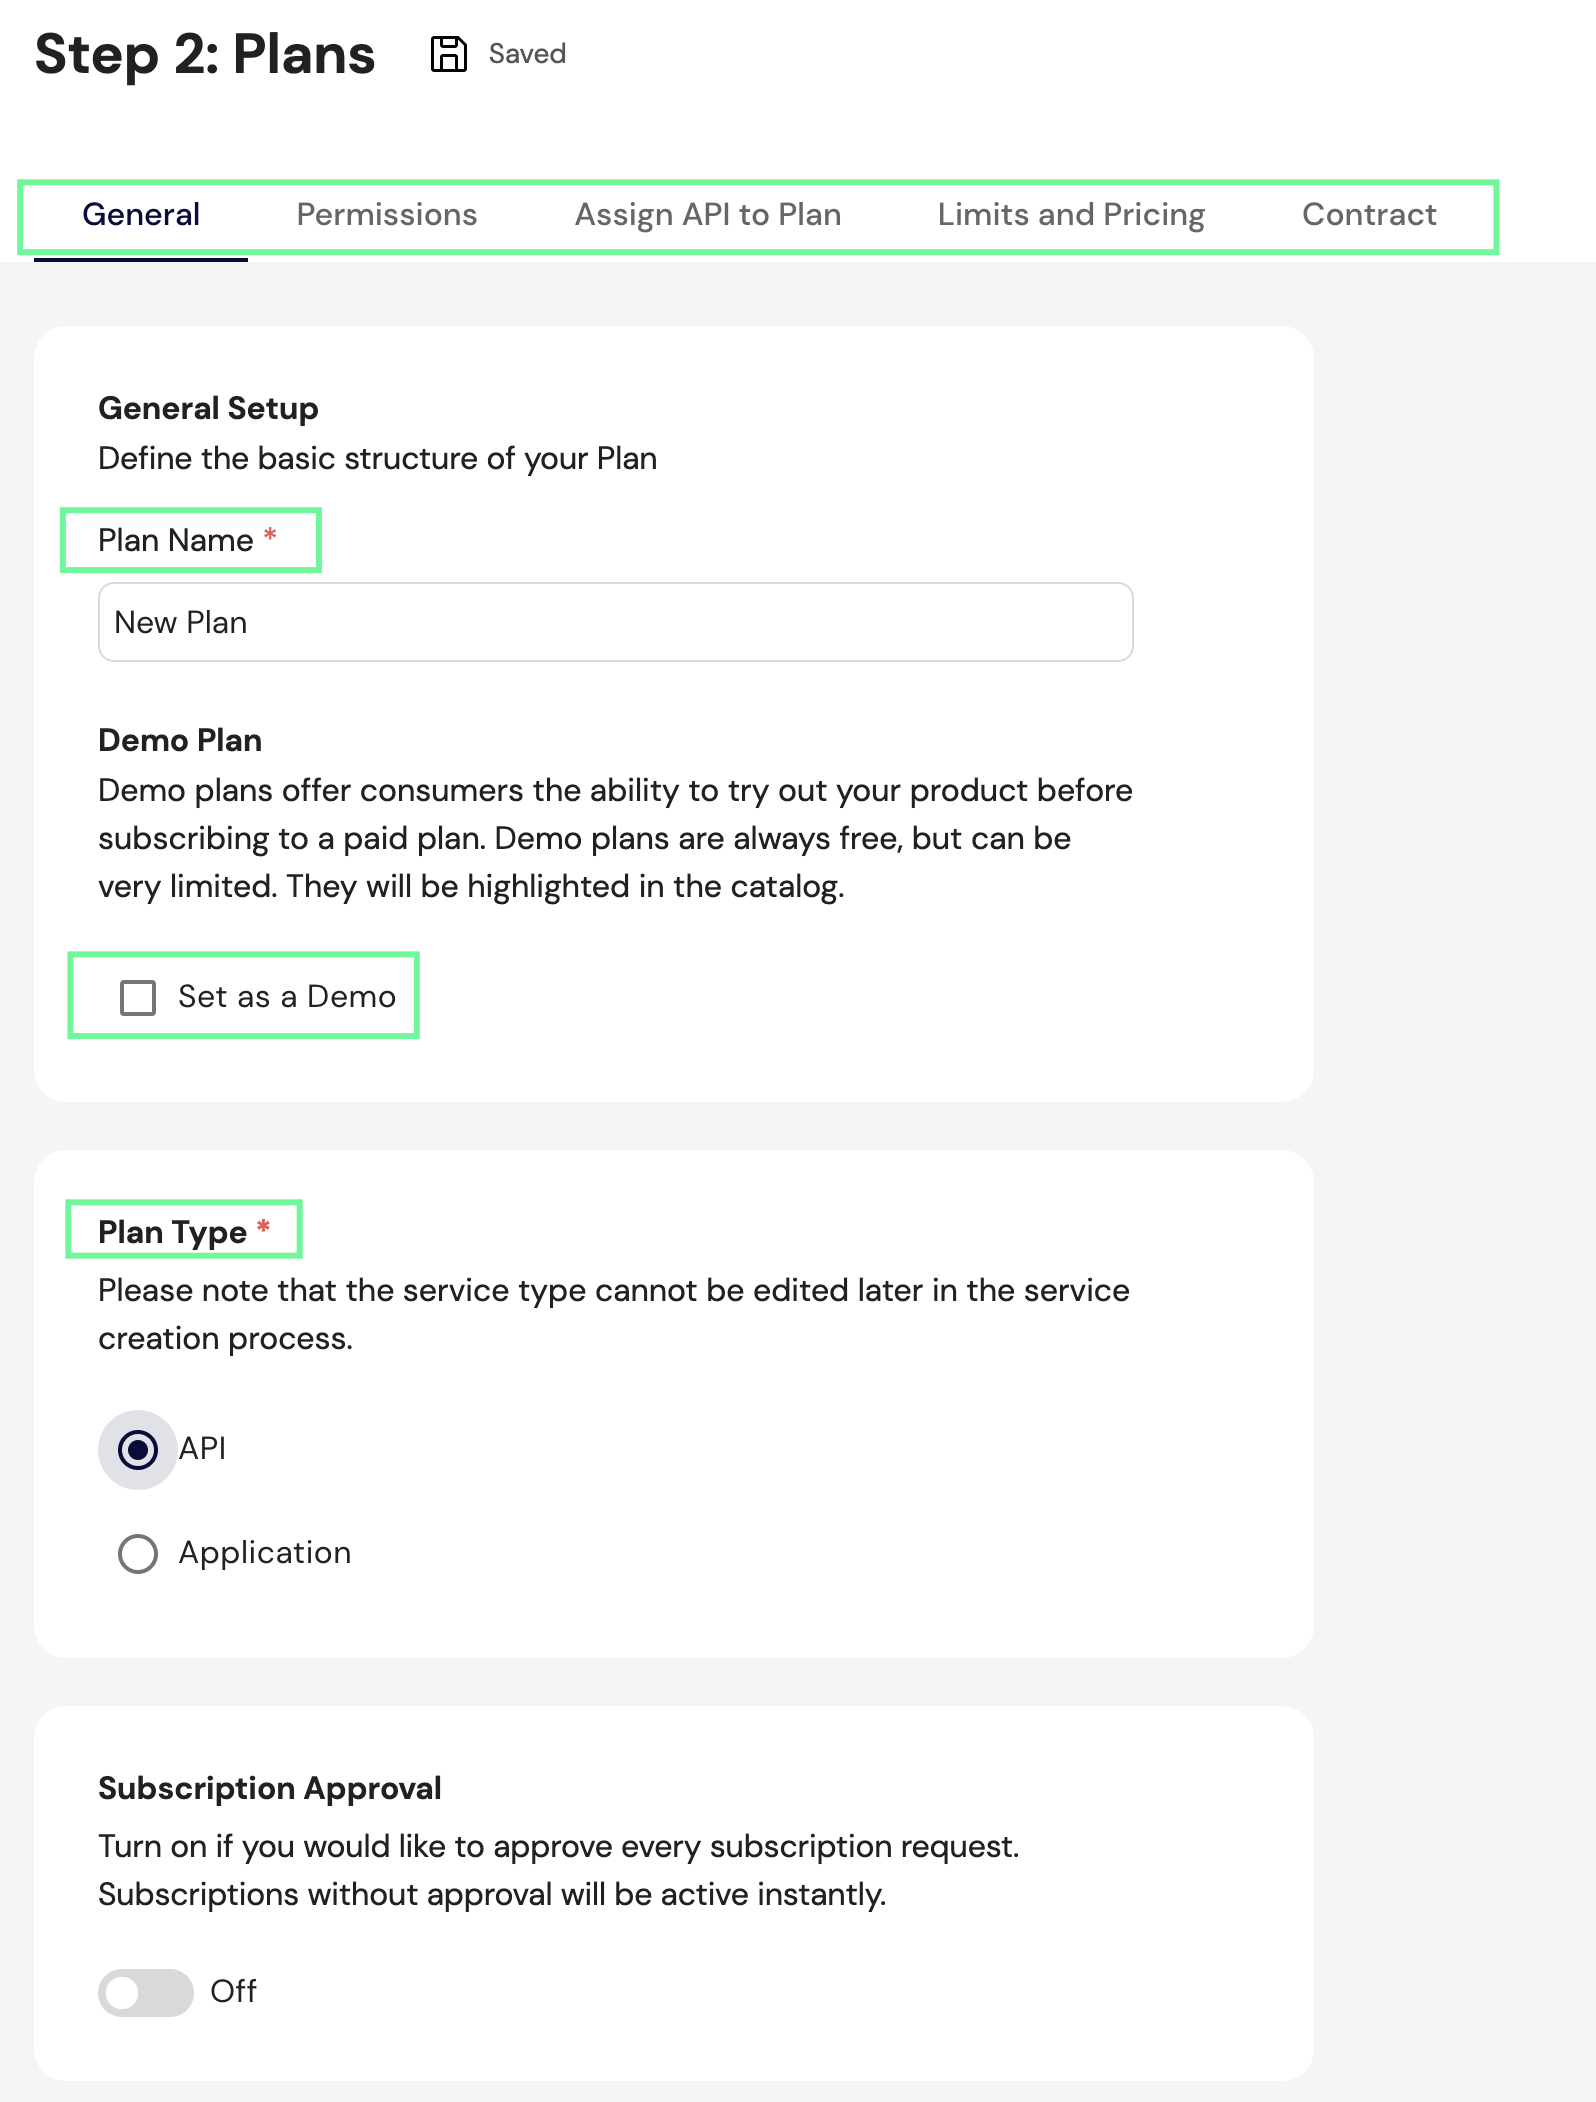


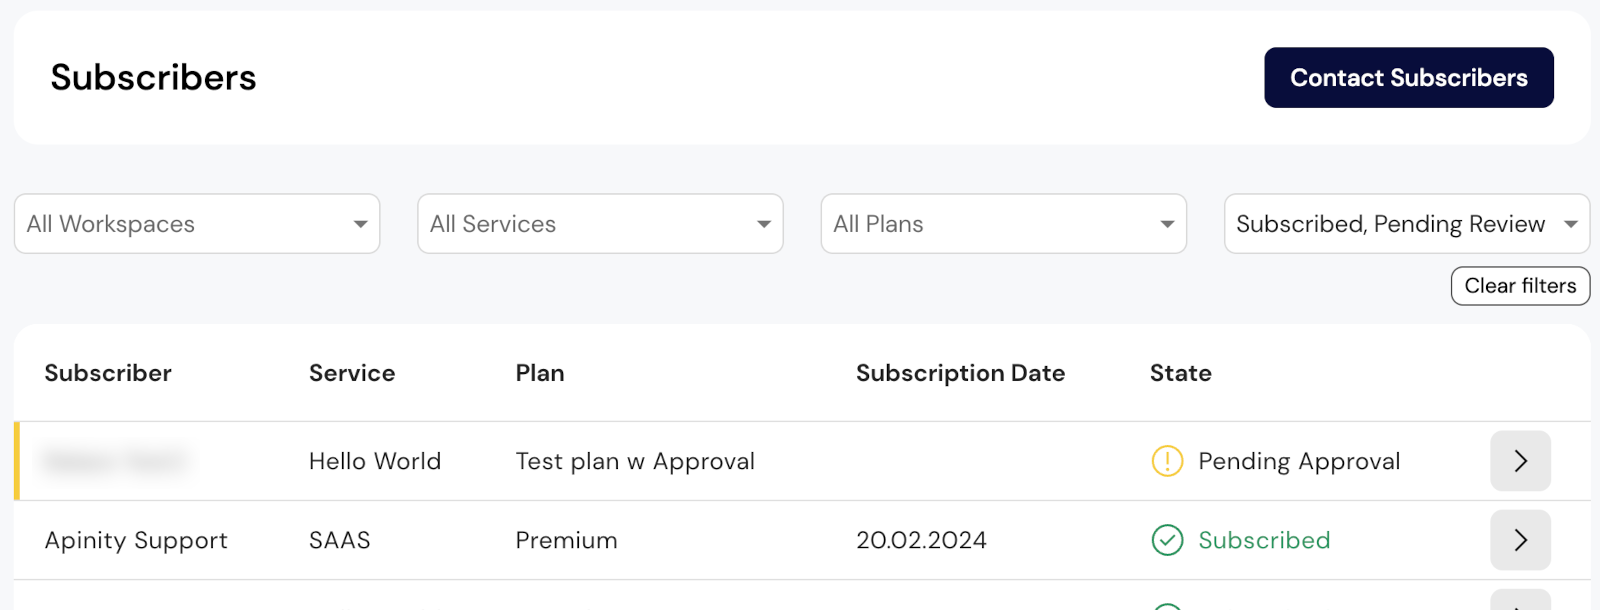


 button . Anyone with this link can access the service page.\
\
For more info, see [Add a Service](/step-by-step/provide-a-service-on-the-marketplace/add-a-service).
### **Plan Visibility**
You can additionally toggle the visibility of individual Plans in the Plans section of the Service Configuration.
button . Anyone with this link can access the service page.\
\
For more info, see [Add a Service](/step-by-step/provide-a-service-on-the-marketplace/add-a-service).
### **Plan Visibility**
You can additionally toggle the visibility of individual Plans in the Plans section of the Service Configuration.